


Originally published on 2014/02/20. Reposting with updates.
Today’s tutorial will cover a property called “exposure” and how its manipulation affects an image.
What is exposure?
Exposure describes how much light an image has received as the result of a combination of elements during the capture of the scene:
- Lens aperture
- The wider the aperture, more light is allowed through the camera lens
- Shutter speed
- The slower the shutter, more light will pass through the camera lens
- ISO setting
- The higher the value, more light will be “absorbed” by the image
Under, over and good exposure
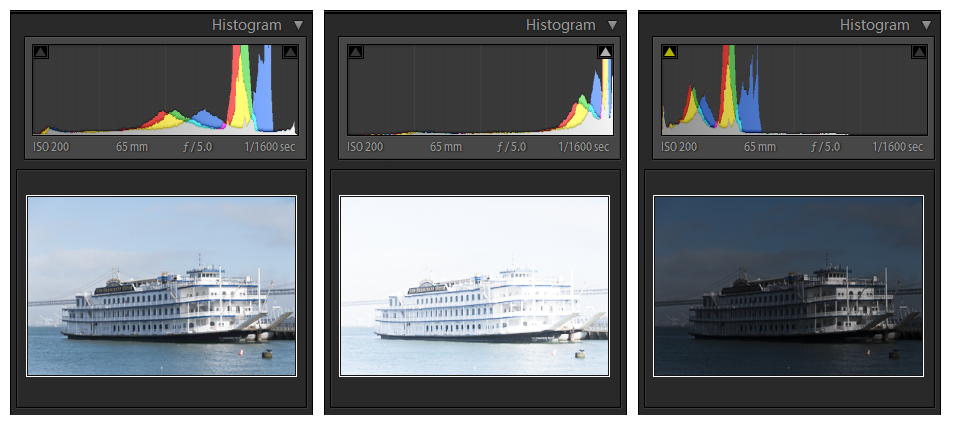
A captured scene can result in a correctly exposed, underexposed or overexposed image. How to tell? Generally, very easily. Underexposed pictures tend to be dark, with details lost in the shadows; overexposed pictures suffer from the opposite problem, being very bright, with details washed out in the brighter areas.
Well exposed pictures have a pleasant amount of brightness and, while maintaining a good balance between lights and shadows, their details aren’t lost.
The histogram
An indicator that can be used to analyze exposure is typically the histogram, which many software and digital cameras can calculate and display (check your camera manual).
A histogram is a graph that counts how many pixels of the picture are at each level between black and white. The histogram accumulates darker tones to the left and moves to lighter going to the right. There are four main histograms, one for the luminosity (black and white) and then one per each of the RGB channels.
If you want to know more, I recommend reading this article at KenRockwell who also talks about color histograms in this other article.
Below I display the histograms of three sample images with different exposure.
Exposure manipulation
Now that we know what exposure is, it’s very easy to see what the manipulation will do: it will control the amount of light the picture has received, but after the fact, thus allowing you to go back and correct the exposure if you got it wrong during the photo session.
The amount of correction that can be achieved depends on the quality of the software used, and is limited to a reasonable few stops before it becomes an obvious manipulation, so do your homework and get the best exposure first. For little corrections or if you really need to dig out the name of that street out of the only picture you have of it, it can be a life saver.
Exposure correction, like all digital processing, works best when used on RAW images, so shoot in that format for your important work.
Exposure in Adobe Lightroom
In Adobe Lightroom, exposure can be modified in two modules, Library and Develop. In the Library module you can add or remove brightness in increments of thirds of a stop, while in the Develop module the control is finer. Additionally, the Develop module offers a set of sliders that control highlights, shadows, whites and blacks separately, and if that was not enough, a tone curve allows to adjust highlights, lights, darks and shadows even further.
If you want to give this a try, simply take a picture and slide the exposure control left or right and observe how the histogram and the image change accordingly, how the details get progressively lost on one end or the other of the spectrum.
Summary
Of course, this is just the technical aspect of exposure. The artistic use of it is left to the creativity of the photographer.
Let’s now summarize the key points around exposure that we have covered above:
- Exposure measures the quantity of light captured in the picture.
- A picture can be correctly exposed, underexposed or overexposed.
- The histogram gives a good indication of exposure.
Check out my other tutorials in the Education section!
