


Ever wondered what it takes to capture a perfect picture? Let’s start with taking better pictures first.
A good picture is a well exposed and sharply focused image of the subject of interest. In this post we will go over the photography parameters involved during the capture of an image. We will cover things like aperture, shutter speed and ISO, also known as the exposure triangle. Understanding their relationship will help you make the right decision to achieve the desired effect. There will be a separate post about how these parameters can be controlled on modern cameras.
The naked camera
Image capture and solidification into a paper print has been following the same rules since the invention of photography. Light reflected from the scene is focused onto a small area, film or sensor. This area is chemically or electronically receptive to the different levels and colors of light received. This original impression is fixates onto a permanent medium through special processing.
The parts involved are very simple: a lens, mounted onto a camera body which houses a recording medium (film or digital sensors). Like a funnel, the lens collects the light from the scene and forces it through a hole. The hole has a variable diameter called diaphragm. An opening and closing mechanism, called shutter, allows the light to reach the recording medium for a certain duration of time.
Altogether, lens, diaphragm, shutter and recording medium concur into defining the exposure of the impression. This can be simplistically defined as the quantity of light stored or captured on the recording medium.
Aperture
The diaphragm diameter is called aperture and controls the width of the hole through which light from the scene reaches the film or sensor. This is not related to the diameter of the lens. Larger aperture means more light, smaller aperture means less light. Aperture is measured in f-stops. The larger the number, the smaller the aperture.
Speed
Shutter speed controls for how long the beam of light will hit the film or sensor. The longer the duration, the more light is captured. Shorter periods correspond to faster speeds. Thus, for longer exposures you will be told to use a slower shutter speed. Shutter speed is measured in seconds, mostly fractions of the unit. So a shutter speed of 100 actually means a duration of 1/100th of a second and so on.
Sensitivity
ISO describes the sensitivity to light of the recording medium, be it film or digital sensor. On film, chemical compounds have evolved granting greater sensitivity to light, thus allowing for usable captures even when little light was available. Low noise sensors are becoming better and better in the digital world. ISO is measured on an international scale with a number that grows with sensitivity. Common values range from ISO 100, to ISO 6400, but higher and lower values are available, especially in digital cameras.
The exposure equation
Now that we know the basic concepts of aperture, shutter speed and ISO, we can draw their relationship to the resulting exposure of an image in an equation that reads approximately like:
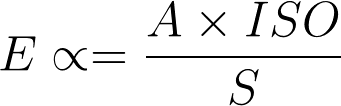
The Exposure Triangle Formula
which can be explained as:
Exposure (quantity of stored light) is proportional to larger apertures, higher ISO, and slower speeds
What this simplified equation implies is very powerful, as it states that the same exposure can be attained by several combinations of the three parameters. For example, if you double the aperture, you could half the shutter speed, keeping the ISO constant. But there’s a catch.
Imperfect world
While the exposure equation is fairly elastic, there are restrictions that limit the real range of variation for those parameters. This prompts us for the need of guidelines on how to effectively choose the values according to the conditions and desired artistic effect. Let’s have a second and deeper look at each of aperture, shutter speed, and ISO.
Focus on aperture
As we know, aperture controls how wide the diaphragm opening is behind the lens. Aperture also has a secondary effect on depth of field. Depth of field (DOF) describes the distance between the nearest and farthest objects in a scene that appear acceptably sharp in an image.
The DOF value depends on subject distance, focal length, and aperture. To give an example, at 130mm, with an aperture of f/2.8, the depth of field is as low as 16cm for a subject 4m away. If the subject moves 10m away, the DOF increases to 99cm. Lenses that allow for smaller apertures are classified as fast lenses. Some lenses go down to f/1.4 or less, as their price climbs considerably.
Aperture is primarily adjusted to control DOF. For example, for portraiture and where you want to isolate the subject, you will want to try and use smaller aperture values, so as to blur the background. For a landscape image, higher DOF is desirable, as you would want as much of the scene as possible tack sharp.
Need for speed
Once aperture is decided, we are naturally inclined to leverage the exposure relationship to rebalance the image. We could for example decrease our speed, and let more light through.
As we know, shutter speed controls the amount of time light is allowed to hit the sensor or film. The longer the time, more light gets captured. That works well if camera and subject are relatively static to each other. However, that is not commonly true, for a couple of reasons: either you are taking a picture by holding the camera in your hands; or you are taking the picture of a non-static object; or a combination of the two.
In any of these cases, there is a chance for introducing motion blur. Motion blur is a sort of smearing effect due to a shutter speed not high enough for the scene you intended to capture. This is generally undesirable, because it loses sharpness or definition in the final image. The use of “long” (very zoomed-in) lenses, emphasizes this issue.
How to avoid motion blur then? By using a higher shutter speed. As a rule of thumb, you should have the shutter speed set at the same value of the length of your lens. For example, if your lens is at 130mm length, then you should use a shutter speed of at least 1/130. Since this value is not on the scale, the next value up will do, which is 1/250.
So, now we are taking a picture of our subject standing 4m away, at 130mm, f/2.8 and 1/250. Depending on how much light there is in the environment, these settings might still not be optimal, and create either an overexposed or underexposed image.
Of light and noise
Environment light is ultimately what validates those settings. While we have followed the best rules for setting aperture and shutter speed, if there is too little light in the scene, we need to somehow compensate for that. One way would be to increase the amount of ambient light, with either flashes or strobes, or simply by other light sources (room lights etc…). The other way would be to increase the sensitivity of our medium: the ISO.
Intuitively we would select the highest ISO setting possible, because that’s what gives the most sensitivity to light, allowing for low light photography.
High ISO though comes at the cost of increased noise. Noise is detrimental to the image quality, as it ruins the clarity of details in the form of grain, and unnatural colorful artifacts. Noise reduction software can greatly mitigate the issue in the digital world.
The practical advice is to leave the ISO set at the lowest practical value possible, and increase it only if the situation demands it.
ISO control depends on the camera body. Different manufacturers, and different camera lines, offer better or worse ISO performance, hence it’s worth testing out what your camera highest ISO setting still yields acceptable images.
Balance and compromise
If we are to streamline the process, we would start by setting the ISO at the camera native or optimal level (typically ISO 100 or 200). Then it’s time to decide the desired depth-of-field, which determines the aperture. The length of the lens and type of subject (static/motion/tripod) determine the shutter speed. If the resulting image is overexposed (too much light), you can adjust by increasing the shutter speed. If the resulting image is, instead, underexposed (too little light), you can adjust increasing the ISO values. Finding the settings to take the perfect picture might take few iterations.
Conclusion
The settings that come into the snapping of a photograph are a delicate balancing act of various components. Understanding the relationship between aperture, shutter speed and ISO, and their implications on depth-of-field and image sharpness, can seem confusing. Mastering the delicate balance between these parameters and their counter intuitive (and sometimes counterproductive) influence, takes time and experience. However, armed with this little bit of additional knowledge, you can now take a more conscious approach to your very next picture. And the results can only be amazing.
If you liked this article, consider sharing it with your friends and use the referral links included when proceeding to a purchase. It helps me a lot, and does not cost you a dime.
Here are few book recommendations.
Bryan Peterson, Understanding Exposure, Fourth Edition: How to Shoot Great Photographs with Any Camera
Buy it on Amazon – http://amzn.to/2FdkwYi
Rick Sammon, Rick Sammon’s Exploring Photographic Exposure: Master Image Capture 1st Edition
Buy it on Amazon – http://amzn.to/2BBGlAP
Jeff Revell, Exposure: From Snapshots to Great Shots (2nd Edition) 2nd Edition
Buy it on Amazon – http://amzn.to/2FdThN0
By using my links to buy/browse gear, you’re supporting my photography and articles.

![]()

![]()

![]()
Credits
- Featured image by Osman Rana on Unsplash
- Exposure triangle diagram by WClarke (Own work)[CC BY-SA 4.0], via Wikimedia Commons
